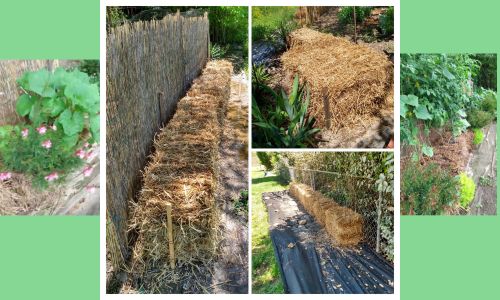
Calhoun County, AL – Do not let Straw Bale Gardening frighten you! If you do not like using a tiller or building raised bed garden boxes, this is perfect for you? These 16 Bale’s in the photos are my wheat straw bales. Once you place the Bale’s where you want them, … hammer some stakes/rebar at the ends of the bale groups. Use strong garden jute string or wire attached to the stakes to sandwich the bales, tightly together. This helps keep the bale’s sturdy as they decompose. I add vertical trellis support. After the last frost and temperatures are above 75 degrees you can start the 14 day preparation (called bale busting recipe). The bale recipe is a rotation with nitrogen (blood meal powder) and water applications. Use a turkey thermometer to test the bale’s have cooled to under 90°. Next, start planting in the bale. Some bale’s can be planted two seasons before falling apart and adding them to your compost bend. I use a garden hoe and add the composted Bale’s to my raised beds. I am sharing my bale buster recipe from my Organic Straw Bale Class, November 7, 2023 at The Anniston Library. RECIPE: Because a straw bale doesn’t have the nitrogen that soil contains, you’ll need to add some. There are multiple options for nitrogen sources, but one of the best is blood meal. Sprinkle about three cups over the top of each bale, water it in well and leave it to soak in. That’s it for day one. For the next two weeks, follow this schedule:
Day 2: Water thoroughly, adding at least 1 gallon of water to each bale.
Day 3: Sprinkle 3 cups blood meal over each bale and water it in with 1 gallon of water. Once you begin adding your blood meal, don’t over water, which will force the nutrients out of the bale. You want the bale wet enough to begin to break down, but not so wet that your blood meal runs out the bottom.
Day 4: Water
Day 5: Sprinkle 3 cups blood meal over each bale and water it in with 1 gallon of water.
Day 6: Water
Day 7: Sprinkle 1.5 cups blood meal over each bale and water it in with 1 gallon of water.
Day 8: Sprinkle 1.5 cups blood meal over each bale and water it in with 1 gallon of water.
Day 9: Sprinkle 1.5 cups blood meal over each bale and water it in with 1 gallon of water.
Day 10: Water
Day 11: Water
Day 12: Water
Day 13: Water and add 2 cups blood meal over each bale.
Day 14: You are ready to plant.
All the nitrogen will make the straw begin composting, which in turns makes a healthy environment for plants. On day 14, you’re ready to plant. Make a opening in the straw and insert seedlings, pressing a peat moss and soil mix around them. If you are planting from seeds, spread a 1 to 2 inch thick layer of potting soil mixed with half sand over the tops of your bales and plant your seeds in that, according to the instructions on the package, or as you normally would plant them. Maintenance your bale’s with water, fertilizer and insect control as normal. However, bale’s dry out in the summer heat quick. I water my bale’s daily when temperature’s are above 85°.
Betty Clark is a contributing writer. She is an organic gardener since 1998. Signature flower she grows are Dahlias. She has a straw bale garden, raised bed garden, and in ground garden. Both her surnames are agricultural farming families (8 generations). Her hobbies include ancestry research, antiques, continued education classes, and workshops. She also has a background in marketing & promotions including expos. To contact Betty Clark with gardening questions: [email protected]


